changing my steam deck's shell + buttons
There are two Steam Decks in my household, and they look exactly the same. It's usually not clear which is which until we turn them on to look. And I've always wanted to customize mine a bit not just on the inside (done so with custom CSS and Decky), but also on the outside. I am a big supporter of the right to repair, but also the right to modify and deface.
I patiently waited until a full custom shell released to the market that I liked and seemed to have good reviews, then put off ordering for another year until now. Careful: Shell is the literal black, outer plastic layer of the Steam Deck; if you search for cases, you will get something you slap on top of the shell for protective or aesthetic reasons. Important difference.
Before you do something like this, you need to consider the following:
- Only do this if you are willing to not game for a while, in case something goes wrong and it is unusable for a while.
- Only do this if you are willing and able to buy a new Steam Deck or replacement parts if it fails.
- This requires dismantling a lot of parts. You need to be organized about the small parts like screws and where they belong, else you won't be able to put it back together.
- Don't buy the first release of a custom shell, they tend to have problems that are fixed in later releases after feedback. Otherwise, you might run into issues like buttons rubbing against the shell, warping, gaps etc.
- Buy shells that come with their own buttons, or buy custom buttons from the same manufacturer, so they are very compatible.
- Make sure that the ventilation is taken care of in the new custom shell. Also, I personally would never get the backplates with a thermal patch in the back, that's literally just extremely hot metal right on the back of the Deck where your thighs or hands will be and you can burn yourself.
- Don't throw the old shell away in case you need to revert or want to sell it with its original shell.
- Make sure you order for the correct Steam Deck - it makes a difference if it is LCD or OLED.
- Remove your SD card from the slot before you do anything. If you don't, it can break.
- Make a backup of your saves if games you play do not have Steam Cloud.
- Watch a lot of YouTube tutorial videos on how to do it.
- Have someone there to help you.
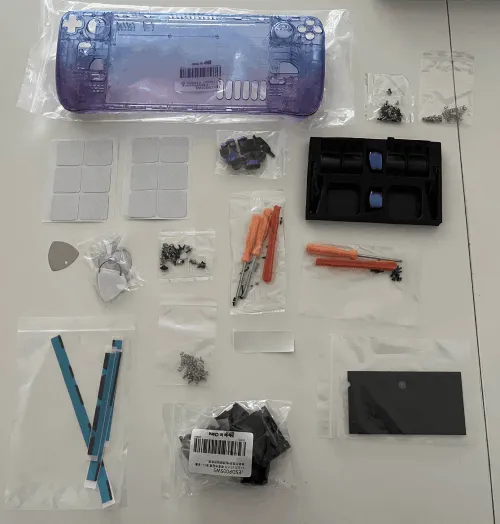
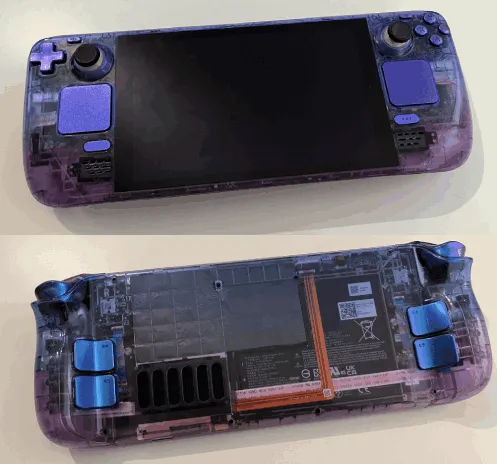
The shell I got is from eXtremeRate, the Custom Full Set with Buttons Gradient Translucent Bluebell.
The set comes with backplate, faceplate, buttons, screwdrivers, screws and springs, so there's nothing else you need to buy. Also, you should have a heat gun or hair dryer to loosen glue. Maybe a mat with organizers for the screws, but that's optional, as is some more cooling paste in case you want to reapply.
I also decided to change the default black buttons for their Chameleon Purple Blue Buttons. This includes the ABXY, D-pad, Trackpads, View/Menu Buttons, Steam Button, Power, Volume, all L and R buttons, screwdrivers and screws. Careful, some of these only fit their own backplates, not the default Steam Deck one.
I know this technically leaves me with three sets of buttons, but at least I have options in case I want to partially or fully revert.
You should really not do this alone. I had help for the harder parts and to have another set of eyes to catch any mistakes or help with alignment, and it was needed. Sharing the difficulties makes it easier and faster to get through and you're less likely to use brute force and breaking something. And I say that as someone who built her own PC as a teen.
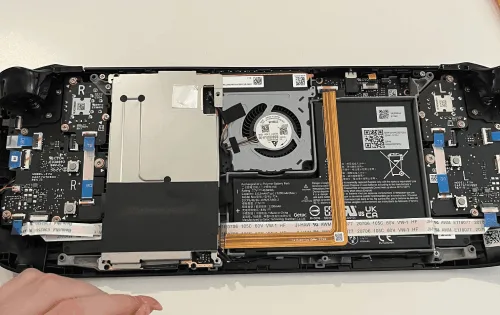
This took me 5 hours in total, so plan accordingly. The opening up and unveiling of the different boards, removing the fan and all that are all fairly easy. Fun, relaxing even. It's just removing screws. The ribbons are only a tiny bit annoying. But the screen is a nightmare.
You need to treat the screen like something that wants to break at all times. It's like a horse that is committed to break all its legs any chance it gets. The problem is is that it is glued in. It is by far the most difficult part. I don't understand why they needed to develop a console like this if it had repairability and customizability in mind. Screens are the number one thing to break on things like these!! You'd think it would be laid in from the inside and held by the case, but no. It's glued in there like a champion, from the front even, and even heating it up with a hair dryer didn't help much. The included plastic chips are too dull and easily bent and breaking when trying to lift the screen, and the metal pick is very sharp and hard, so if you slip, you risk scratching the screen, chipping the border or cutting through ribbons on the underside. I didn't manage, so my fiancée helped, and she literally cut her finger doing it and bled. There's a real risk you hurt yourself, break or scratch the screen or the inside if you insert it too far.
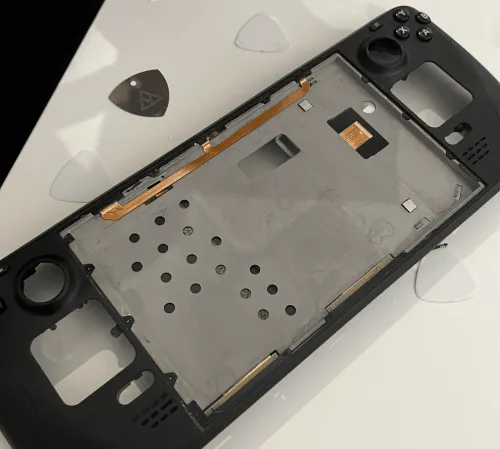
In the end, we were able to lift up all four corners with the white plastic picks wedged in, and then carved the rest out with the metal pick. Another similarly difficult part is the replacement of the touchpads; the removal from the case itself is easy, but then you have to detach the motor from the old touchpad and attach it to your new one. That also involves wedging a tool in and lifting with pure violence, bending the touchpad until the glue gives, even with hot air. It's nothing for weak nerves. There's a reason many, many people online choose not to replace their touchpads.
Other than that, I made sure to separate my removed screws in a pill box I have, but the how-to video wanted me to use the shell manufacturer ones included and then made a shit job showing which ones, and they were also not separated. In the end, I can only say: they are all the exact same, so feel free to use the original, sorted screws as long as you didn't strip or break them during removal. Mine were fine. The shell manufacturer ones were never shorter or longer or of any better or worse quality.

When you install any kind of button, test it immediately. Of course you cannot know the electrical response yet (most buttons are installed in the middle of the entire process, so no turning on yet), but you can see whether you like the resistance and placement, if it's too loose or tight, rubbing against the case or not. If you realize later, you'll have to undo almost everything. Thankfully, all my buttons were always immediately fine, and I like the touchpads more than before. I find the default touchpads too wobbly on the Deck.
Difficulties aside from the insane glued in elements were applying new glue, and remembering to get all ribbons and cables out of the way so they aren't trapped underneath somewhere when they're needed. Also discovering I somehow put screws where I shouldn't have and needing to undo them.
Would I do it again? If it wasn't for the screen, yes. The touchpads are whatever, you can leave them black in literally any setup and it would still look good. But the screen, hell no. This is the gamer version of the Dalgona cookie challenge. I hope the next Steam Deck doesn't use glue on the screen, man.
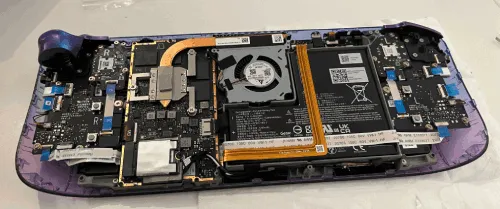
But it paid off. So far, the Deck works. Sound, vibration, screen, lights, SD card etc. I'll see if it does anything weird in a longer gaming session soon, but so far I notice nothing off. Only two or three hours later, my fiancée already mused about modding her own Steam Deck too, so I guess the result is overshadowing all the pain and stress already.
Because I can't host a video here, have a gif of the result:

By the way, Valve publishes the CAD files for the Decks, so if you want to make a shell or case yourself (or any other adjustment or ornament that needs these measurements), you can.
Published